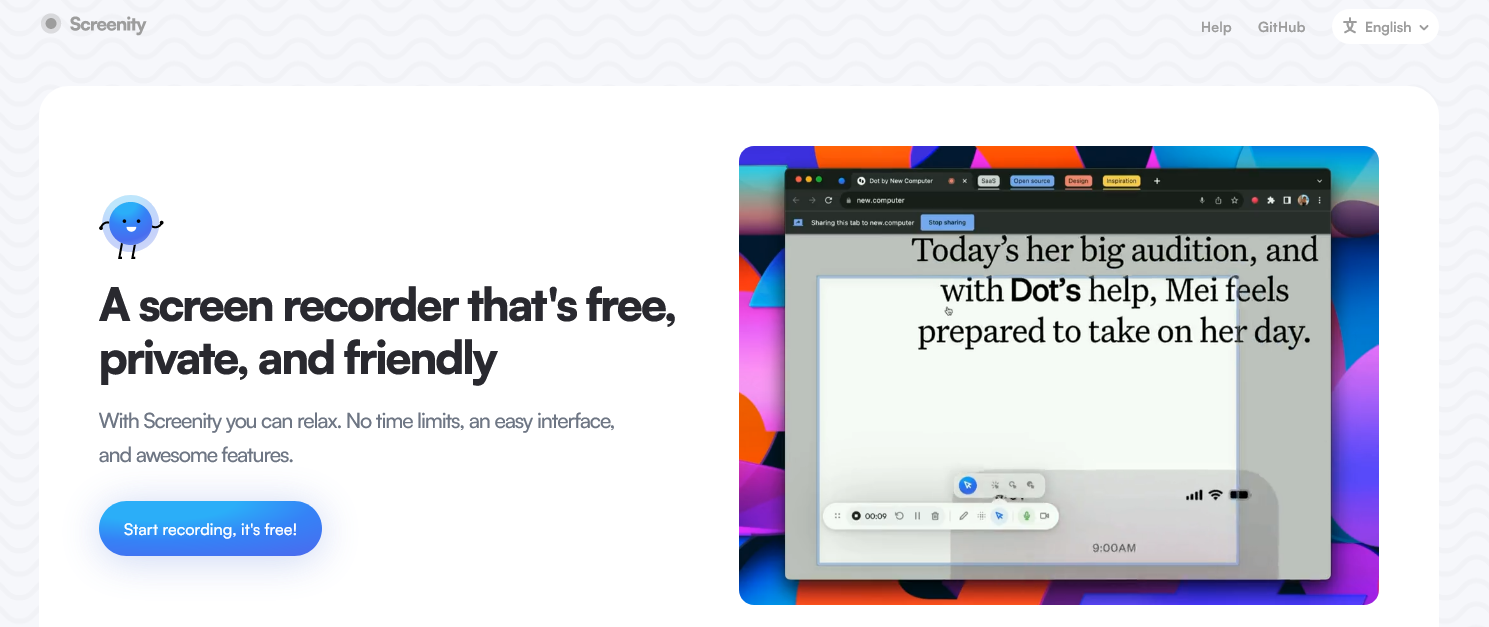
Screenity is a free screen recording and editing tool. It is a powerful, privacy-conscious screen recording and annotation app developed by Alyssa X. The project is open-sourced on GitHub , and is currently available for Chrome and Chromium-based browsers on the desktop; users can use Screenity to create unlimited product demos, tutorials, presentations, and other work and educational videos. This article will introduce Sreenity. In this article, I will introduce the features of Sreenity and how to use Screenity to record videos.
For a long time, I worked part-time in filming instructional videos using these tools to shoot and record: Camtasia, MS PowerPoint, and Logitech Capture.
Screen recording is only a part of Camtasia’s functionality, and every time you use Camtasia to record a video, you will be automatically taken to its video editing page instead of exporting the video directly.Camtasia’s video editing page gives you the camera, recorded screen, and sound tracks, which enables you to realize the basic functions of video editing. Camtasia’s video editing page gives you three tracks for camera, screen, and sound, which is very similar to Adobe Premiere Rush. However, Camtasia’s software license must be re-purchased with each major version update, or else you are only allowed to use the old version.
PowerPoint, on the other hand, can only cope with some simple tasks, and its screen recording is limited to the recording of speeches, not the recording of pages from other applications. At the same time, the position of the speaker’s headshot, background defocus, keying and other functions have greater limitations, video editing is difficult, etc. Logitech Capture and Logitech Camera are bound together, the recording style is moderate, the application does not provide video editing functions, the end of the recording video file directly exported to cope with most of the video recording. OBS was also one of the options, and it’s one of my personal go-to tools, but it’s not recommended due to the fact that it’s feature-rich, highly customizable, and a bit complicated for average users.
In addition to the four tools mentioned above, there’s also Screen Studio as well as screen recording extensions of the same type, Loom, Screencastify, and so on. In my opinion, Screenity is a great replacement for Screen Studio.
Quick Overview of Features
Unlimited recording, unlimited duration, unlimited number and unlimited area of videos, browser tabs, desktop, various applications, designated areas or cameras can be recorded, and offline operation is supported without collecting any data.
For sound, you can record microphone or internal audio and use features such as key intercom; for video, AI technology provides camera background or blurring effects to enhance the recording; for recording, you can set a countdown to automatically stop the recording process.
Drawing annotations anywhere on the screen during recording, adding text, arrows, shapes, and other elements; highlighting cursor and clicking operations, and focus mode; smooth zooming for focusing on specific areas; blurring of sensitive content on the page; and more.
Comprehensive editor to remove or add audio, cut, trim or crop video, support export to mp4, gif and webm formats, or save directly to Google Drive and share linked video files.
Like most screen recording extensions, Screenity asks the user if they want to give permission for which screens to share, a certain tab, a certain window, or the entire screen. Although Screenity can record screens outside of browser tabs, most of its functionality is limited to in-browser use.
Before recording, users can select the resolution of the video to be recorded, which defaults to 720P, as well as selecting the entire screen, a custom area, or just the camera for recording. Regarding the camera and sound, Screenity offers portrait segmentation to blur or toggle different colored backgrounds, and the microphone can be set to enable the keystroke talkback feature to record sound only when Alt+Shift+U ( Option+Shift+U on Mac) is pressed.
If the content to be recorded is a slide show or other presentation documents, the recording of the markup can be realized since the corresponding document editing tools, such as PowerPoint can be used in the annotation tool, in the recording of the screen on the slide to annotate. For other contents of the screen, you must rely on recording tools or later editing to achieve, in the recording process, Screenity provides a variety of tools to enhance the screen recording effect.
On-screen Commentary
Like common screenshot/paste tools, Screenity allows users to freely draw various shapes, arrows, add text and images, and annotate by highlighting and erasing while recording the screen.
Cursor Focus
Screenity offers three cursor forms in addition to the normal cursor, a highlighted click that appears as a red circle when clicked to emphasize the action when clicking anywhere with the cursor, a transparent highlight that follows around the cursor to highlight the cursor, and a focused cursor that dims everything but the area around the cursor to maintain focus on the area around the cursor.
Page Zoom
Holding down Alt+Shift+E on Windows or Option+Shift+E on a Mac smoothly zooms in according to where the mouse is pointing, and releasing the key reduces the zoom to its original size; this feature currently only works for in-browser pages.
Vignette Tool
In addition to blurring areas that need to be hidden before recording, users can also click Pause Recording during recording to add bokeh, or use it directly, and then trim it in the video editing panel to cut out any video clips that haven’t been blurred yet.
Edit and Export
After recording stops, Screenity will automatically export the video to the above editing page. On the video editing page, Screenity provides the usual editing functions, allowing users to crop the length and size of the video; audio processing, removing or adding audio allows users to add a background music-like or replacement audio to the video; Screenity can only operate on a single track, and although users can add multiple pieces of audio, there is no way to edit individual pieces. Screenity only works on a single track, though you can add multiple tracks, but you can’t edit individual tracks, and adding audio only overlays it, while deleting it removes all the audio in the selected time period and mutes it.
Screenity is not presented as a standalone application, it uses FFmpeg WASM to record, convert and stream video and audio inside the browser; since Screenity runs locally, it is limited by the hardware of the device, and the processing and editing limit is set to 5 minutes by default inside the application, while for longer videos, the processing time will be too long and the resource consumption is very high, editing is not allowed by default. For longer videos, the processing time will be too long and resource consuming, and editing is not allowed by default.
However, users can choose to continue processing to edit the video depending on the performance of their device, and Screenity also plans to launch a cloud version that will run on cloud servers without being limited by the performance of the device. As with editing, videos longer than 5 minutes do not support exporting to MP4 by default, and users will need to choose whether or not they want to continue exporting based on their device.
In addition to exporting to MP4, Screenity also supports exporting to webm, the raw video file under the “Advanced” option on the editing page is also in webm format, and videos within 30s are supported to be exported in GIF format. However, the GIFs exported by Screenity are sometimes not clear enough, and will appear like a grid, I recommend using PixPin to create screen recording GIFs.
Most of the tools related to screen recording or video processing require payment, whether it’s Camtasia, Screen Studio, Loom, or any other software mentioned above, you need to pay for the full functionality. Screenity is an open source tool that is as free as OBS, but easier to use than OBS, with features such as annotations and focusing during the recording process that make Screenity even better. At the same time, the author of Screenity is a very productive developer, who has developed and designed a number of interesting tools, so if you are interested in it, you can try it out.
Published by Tony Shepherd & last updated on April 15, 2024 3:55 am