
MusicBee is one of the popular music player and management programs that can be downloaded on Windows operating system for free. If you are a serious music lover, you surely know this program which makes it easy to manage, find, and play music files on your computer. Yes, MusicBee is powerful and you probably rely on it as your day-to-day desktop music player, but there are still chances you might need to uninstall MusicBee because you are experience problems in using it. For example, your installation of MusicBee is corrupted, MusicBee doesn’t start when you launch it, or you just no longer wish to use it. Don’t know how to uninstall MusicBee and its supporting files and registry entries completely? Take it easy. Here are the best ways that help you effectively remove MusicBee with no traces left behind.
What is MusicBee?
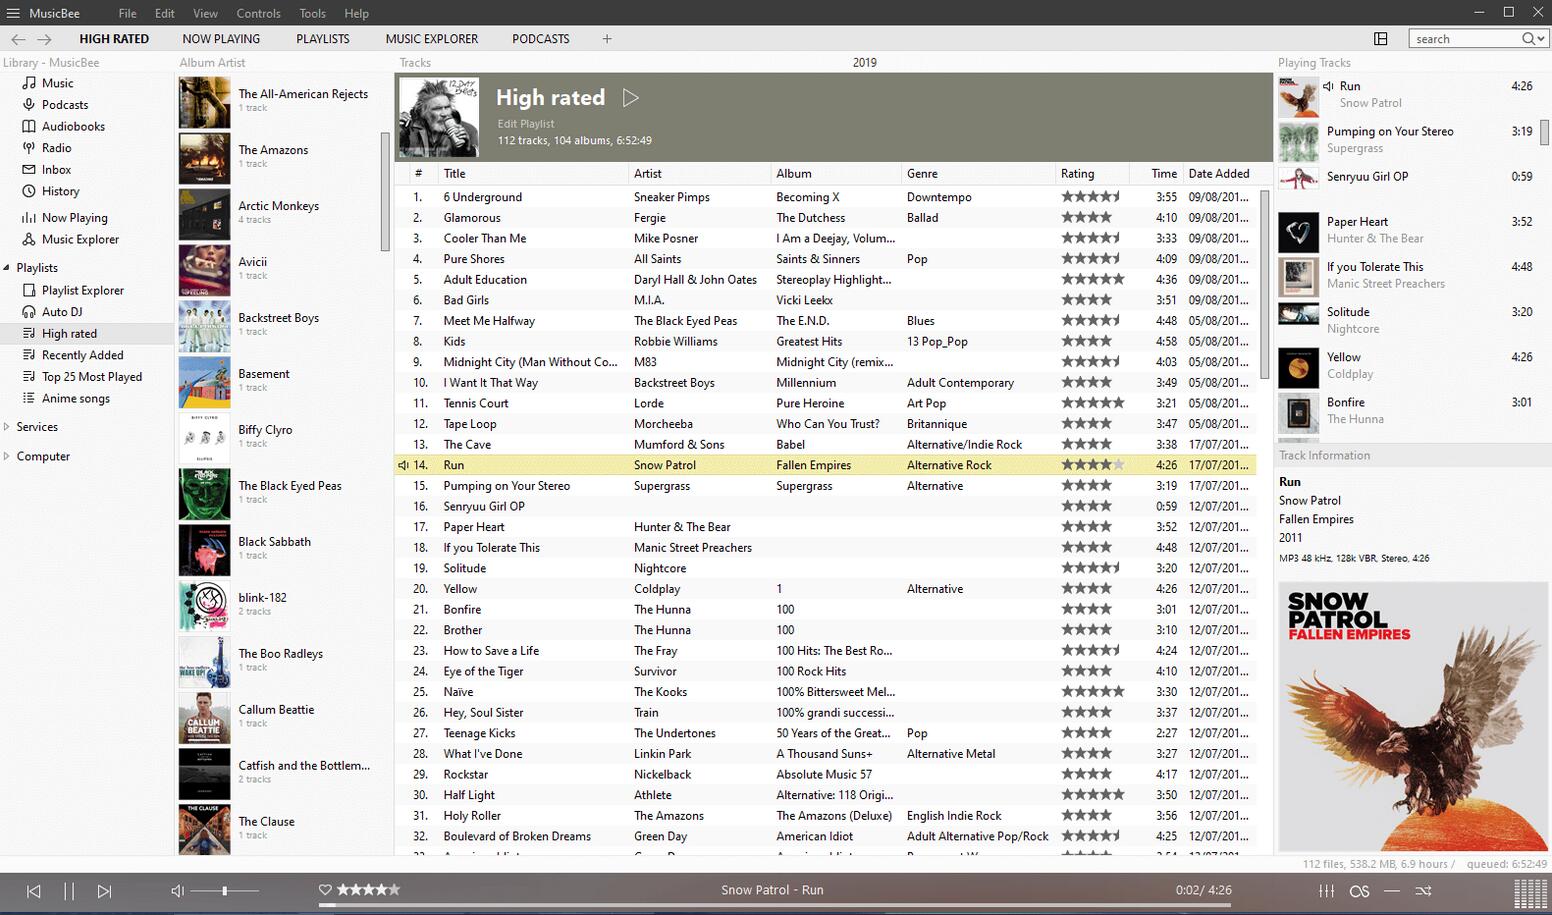
When it comes to the best music player for Windows, MusicBee is definitely the one you should take a look at it. It is a powerful, easy-to-use and free music manager authored by a person called Steven Mayall, who develops this great application in his spare time. MusicBee is the first best iTunes alternative on the list but it is only available on Windows 7, Windows 8 and Windows 10. MusicBee is lightweight, and customizable. Its interface is plain and intuitive, with a list of tracks dominating the center of the screen and a list of directories down the left side, just like many other music players. However, it offers more than just music playback. Aside from playing popular music formats, MusicBee supports automatic tagging, music management, CD ripping, automatic playlists, music conversions, audiobook and podcast support etc, and it offers many tools to help you organize your music collection. With MusicBee, you’ll find it easy to organize, find and play music files on your computer, on portable devices and on the web. You can manage large music libraries, create your own unique player, and easily find what you want to hear. In addition, you can import libraries from iTunes and Windows Media Player, and sync Android phones, USB drives, some iPods, and many other portable music devices with your library, playing your music the way that you want at anywhere. Speaking of file formats, MusicBee supports many formats, including: MP3, AAC, M4A, MPC, OGG, FLAC, APE, Opus, TAK, WV, WMA and WAV. It is a must-have music manager application for every Windows user.
Failed to Uninstall MusicBee?
MusicBee is not the only option when you choose a free music player. Therefore, there are times you may consider other alternatives and want to uninstall MusicBee from your PC. Some people uninstall MusicBee because they think the interface of MusicBee feel a bit overwhelming and it is a bit buggy at times. Another reason is MusicBee is not open-source although Steven Mayall is very active on the forum in solving problems that the MusicBee users meet. Uninstalling MusicBee is not so hard but sometimes you may experience problem in doing that. Just like this case that found in MusicBee forum:
“The uninstall file is not in any of the MusicBee folders. It does not show up in any uninstaller program or Windows 10 programs and features. I installed the portable program on my D: drive and now I am unable to find a way to uninstall it. Any ideas? Thanks!”
Well, in most cases, uninstalling programs using Windows’ built-in options does work to get rid of the program itself. However, the process often leaves behind detritus in the form of leftover folders and files and scattered Registry entries. That’s why you still need to remove MusicBee manually, or use a third-party uninstaller such as Uninstallor which can fully wipe out MusicBee entire applications, leaving no traces behind. Now follow the instructions below to uninstall MusicBee and its leftovers step by step.

How to Completely Uninstall MusicBee on Windows 10?
Uninstall MusicBee Manually:
Windows provides several ways to let you uninstall any unwanted programs. You can do it through the Start Menu, or via Settings -> Apps & Features window and Control Panel. Choose a method that you prefer to uninstall MusicBee. To make sure MusicBee is removed completely and no traces are left behind, you have to manually delete its files and registry entries after the program is uninstalled. Now let’s get started.
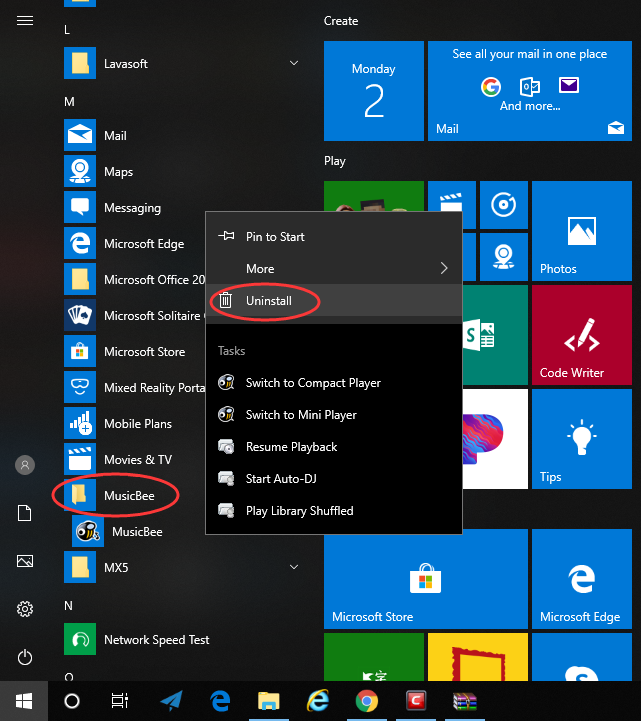
1: Uninstall from Start Menu
Windows 10 added an option to uninstall apps with a right-click in the Start menu. To do this, go to Start > All apps and find MusicBee. Right-click on it and then click Uninstall from the drop-down menu that appears. If you can’t find MusicBee in the Start menu, you can try other methods listed below.
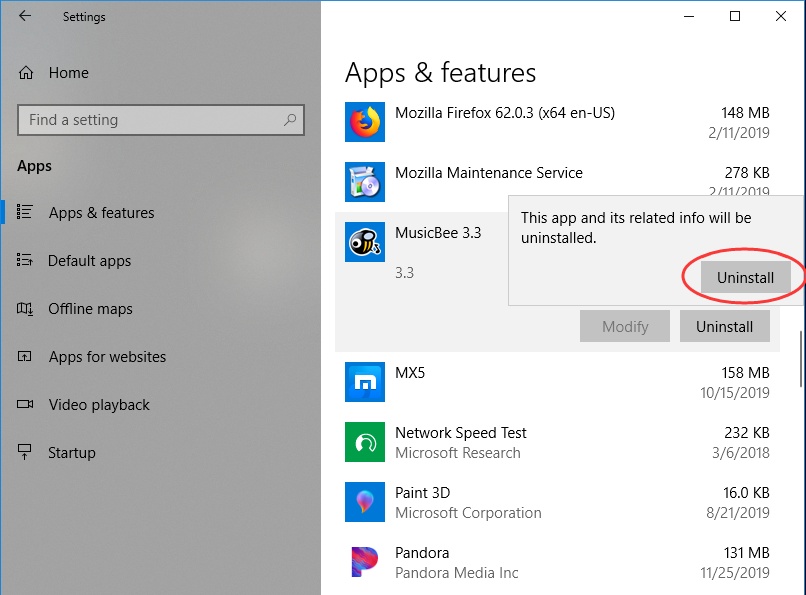
2: Uninstall with Apps & Features
In some cases, you cannot find an app or program that you want to uninstall in the Start menu. So, you can try to open the “Apps & Features” page in the Settings app and uninstall MusicBee from there.
1. Go to Start->Settings.
2. Choose System and then click Apps & Features from the left pane. You will see a list of all installed apps appear in the right pane, sorted by size, name or install date.
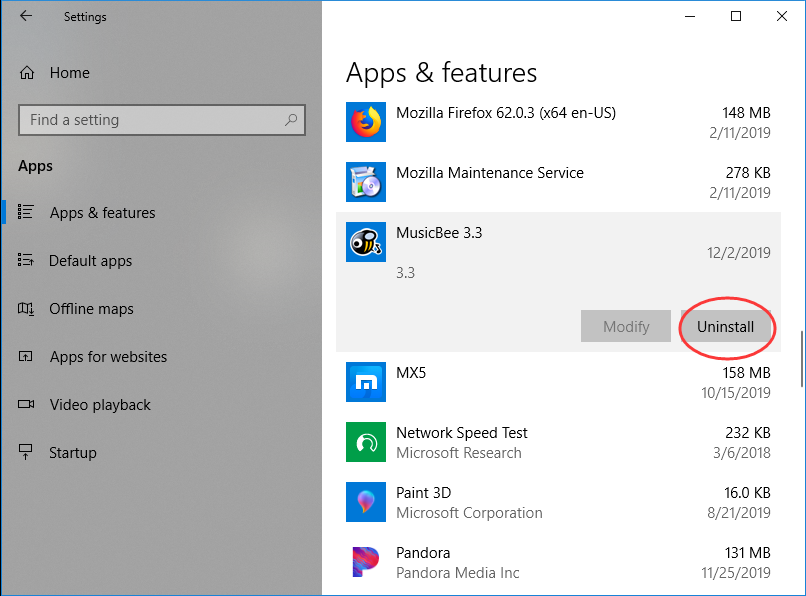
3. Select MusicBee and Click Uninstall to start the removal process. You may need to confirm the removal by clicking Uninstall in the pop-up window. When it’s completed, MusicBee will disappear from the list.
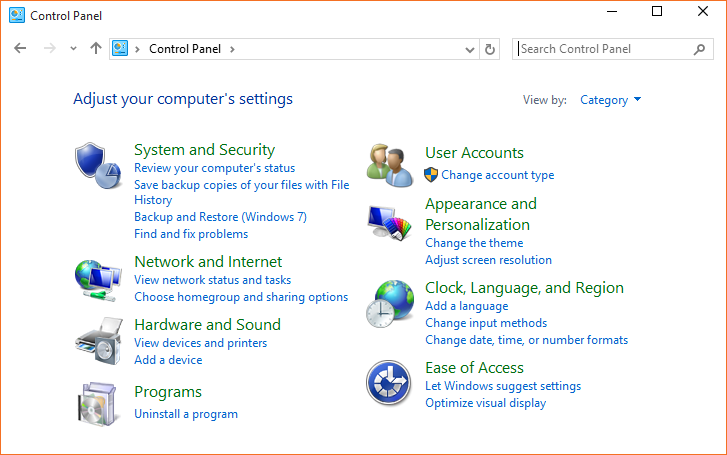
3: Uninstall through Programs & Features in Control Panel
If you’re really devoted to using the Control Panel for uninstalling MusicBee on Windows 10, that still works too. But please note it only works for traditional desktop programs, not apps. Do the following:
1. In Windows 10, click the search box on the taskbar. Then type control panel and click the Control Panel search result.
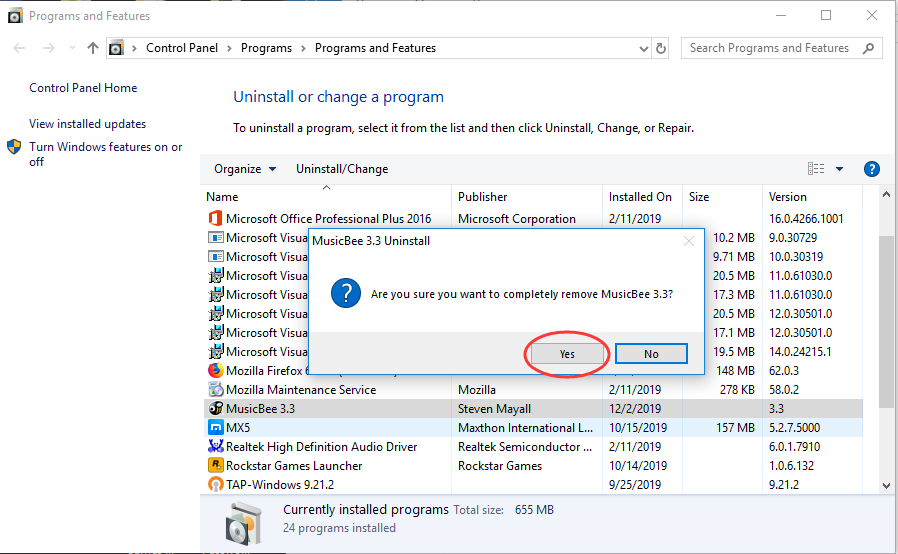
2. Go to Programs and Features (or go to Uninstall a Program if your Control Panel is in the category view).
3. This tool will pull a complete list of programs installed on your computer. Scroll through the list until you find MusicBee. Right-click MusicBee and select Uninstall. You’ll see a pop-up window asking if you’re sure you want to uninstall this program, click Yes to proceed the uninstallation. After it is done, you have to reboot your PC to take effect.
(IMPORTANT) One More Step – To Manually Delete MusicBee Leftovers:
Warning: This manual removal instruction contains information about modifying the registry so it is for ADVANCED USERS only. If you use Registry Editor incorrectly, you may cause serious problems that may require you to reinstall your operating system. Make sure to back up the registry before you get started. And you need to understand how to restore the registry if a problem occurs.
Check the following folders and delete associated files first.
- C:\Users\[your username]\AppData\Roaming\Microsoft\Windows\Start Menu
- C:\Program Files (x86)\MusicBee
Next, you have to delete MusicBee entries from Windows registry.
Press Windows + R, and type in regedit in RUN box, then press Enter. It’ll open Registry Editor.
Locate the following keys:
- HKEY_LOCAL_MACHINE\SOFTWARE\Microsoft\Windows\CurrentVersion\Uninstall
- HKEY_CURRENT_USER\Software
- HKEY_LOCAL_MACHINE\SOFTWARE\Wow6432Node
If you find any keys with the name of MusicBee, just delete such keys.
If the above methods are not working, you can try to use an easier and no computer knowledge required approach to complete this task by using a third-party uninstaller like Uninstallor. It can uninstall any unwanted programs, such as stubborn software, toolbars and plug-ins, Windows 10 built-in apps, and any other bloatware, bundleware.

Uninstall MusicBee Automatically with Uninstallor (Recommended)
There are many third-party uninstallers for Windows 10 that are designed specifically to make it not only possible but also easier for users to uninstall unwanted applications, and Uninstallor happens to be one of the best. It will automatically scan and collect all related files and folders left in the system, and then clean them up with one click, which is very useful to free up disk space and keep the system stable. So without wasting time let’s see how Uninstallor works to uninstall MusicBee completely:
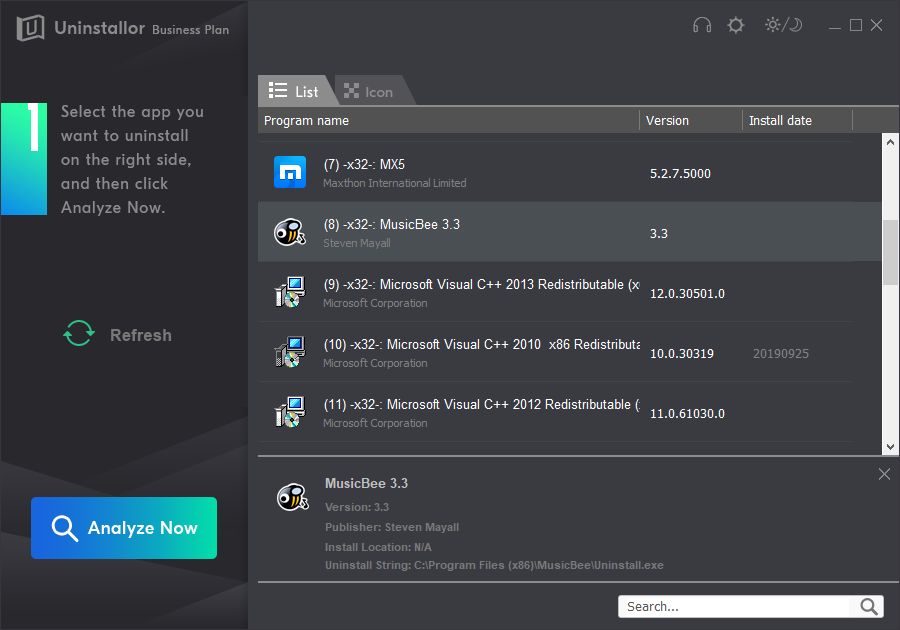
1. Analyze
Double-click Uninstallor icon to launch the program first. It will display all the programs installed on your computer. Select MusicBee and click on Analyze Now button, then it will analyze all the data associated with MusicBee and searches for all its leftover files automatically.
2. Uninstall.
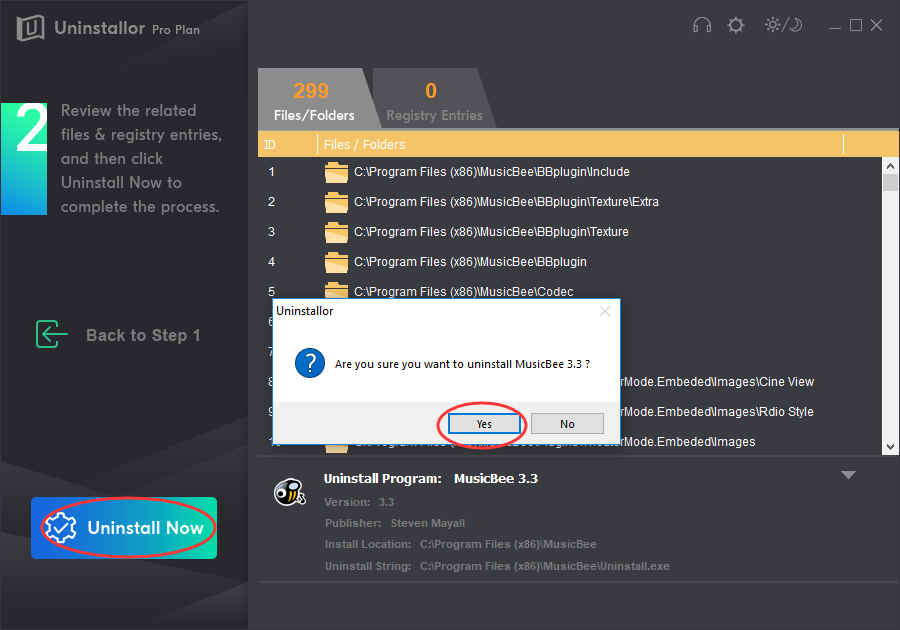
Click on Uninstall Now button to start the MusicBee removal with Uninstallor. Next, you need to click on Yes to confirm the removal.
3. Remove.
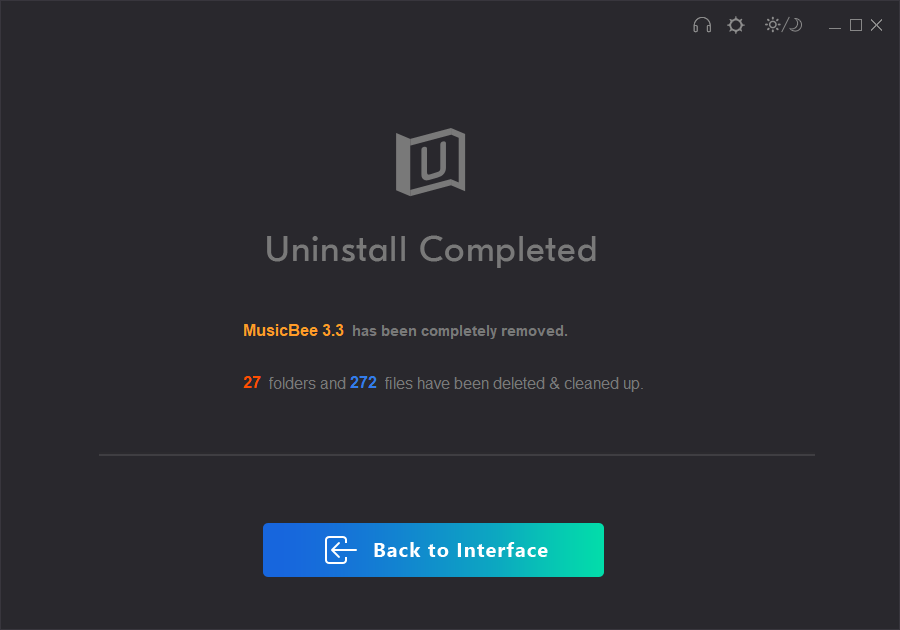
Click Remove Now to clear all the components for MusicBee, and you’ll get a warning asking if you are sure to remove MusicBee’s leftover files and registry entries, simply click on Yes to confirm the removal. When Uninstallor tells you that MusicBee have been removed, just reboot your computer to take effect.
Video Guide on How to Uninstall MusicBee
Conclusion:
Can’t uninstall MusicBee from your PC because an error occurred? MusicBee won’t go away completely and leaves many leftover files in the hard drive eating up system resources? If you are experiencing problem in uninstalling MusicBee, this instruction is written for you. Follow the above instructions, you can uninstall MusicBee manually, or use a reliable uninstaller like Uninstallor to get rid of MusicBee automatically with one click. Manually uninstalling a program is convenient because it doesn’t involve installations of third-party applications, however, it’s for advanced user only. A small mistake while editing registry entries might adversely affect the functioning of your machine and the manual method may take a bit more time. Thankfully, there are many 3rd party software like Uninstallor, etc are available on Internet which claim to completely uninstall a software program in Windows without leaving a trace. It is easy in use and allows you to uninstall Windows apps, toolbars and plug-ins with several clicks, saving a lot of time and energy for you. Try Uninstallor Now! 30 Days Money-Back Guarantee.
Published by Tony Shepherd & last updated on January 9, 2020 12:23 pm


Leave a Reply
You must be logged in to post a comment.