
People who install G Data Antivirus on their Windows or Mac computer because they want to keep their data and systems secure. But there are times they also need to uninstall G Data Antivirus. For example, the trial period is over and you find the program is not what you want, or your G Data Antivirus subscription expires and you don’t want to continue anymore, so it just stops updating the essential virus and malware databases and cannot help you identify or clean new threats. Or you just run into trouble while using the software and you just want to reinstall it to give G Data Antivirus a new lease of life, fixing many common issues you may be experiencing. Regardless of the reason, once you decide to uninstall G Data Antivirus, you are recommended to follow the instructions below. We have provided THE MOST EFFECTIVE methods to help you uninstall G Data Antivirus on both Windows and Mac thoroughly without leaving a trace behind.
About G Data Antivirus

G Data Antivirus is a basic security product made by a German software company called G Data CyberDefense AG (until September 2019 G Data Software AG), which has been providing security in the digital world for over 30 years. From basic protection against viruses to an all-round, all the features that you are expecting from the best security product could be found from G Data. And the best thing of all is, G Data Antivirus comes with relatively fair pricing and it offers you a 30-day free trial to let you test its service before committing.
G Data Antivirus is super easy to install and use on Windows, Mac, and mobile devices. Despite it is the baseline product, it goes beyond the usual PC antivirus fundamentals and it is feature-rich. G Data Antivirus provides virus and malware protection, anti-ransomware, URL filtering, a spam filter, and specialist browser hardening to help secure online banking and shopping. It also protects your computer against criminals exploiting security holes in Office applications and PDF readers. Once it is running, it scans your system for widely distributed malware and digs up new or localized threats without causing any noticeable strain to your computer system. But, G Data Antivirus is a product that just focuses on the essential task of antivirus protection. So, it doesn’t include a firewall which protects your computer from being spied on, nor the real-time protection feature that can protect your system as soon as suspicious activity is detected. That’s why some people choose to uninstall G Data Antivirus and look for other better alternatives.
If for any reason that G Data Antivirus doesn’t meet your expectation or G Data Antivirus stops working and you want to reinstall it, you are recommended to follow the instructions below to uninstall G Data Antivirus completely. The following sections contain manual and automatic methods for uninstalling G Data Antivirus from a computer running Microsoft Windows and Mac. It ensures no leftover files will remain after G Data Antivirus is uninstalled.
Why People Uninstall G Data Antivirus?
There may come a time when the antivirus program that you have selected simply isn’t living up to your expectations. Just like this G Data Antivirus, people uninstall it usually because of the following reasons:
1. G Data Antivirus takes too long to scan.
2. G Data Antivirus uses too many resources and cause system slowdown problem.
3. G Data Antivirus doesn’t offer the features you want to protect all of your systems.
4. G Data Antivirus is not working properly and you need to first uninstall and then reinstall it.
5. G Data Antivirus fails to prevent a malware attack.
6. G Data Antivirus conflicts with other security products on your computer.
Whatever the reason might be, once you decide to uninstall it away, you can follow the guide below.
Uninstall G Data Antivirus on Windows 10
Typically, there are two methods to uninstall G Data Antivirus completely. You can either utilize a professional uninstall utility like Uninstallor to cleanly uninstall G Data Antivirus and remove its leftovers. Or instead, you can carry out a standard uninstallation and then manually delete its associated files and registry without spending a penny. However, the latter method requires you to have some expertise in editing the registry because if done improperly it can cause problems with your computer. Here are the steps you need to go through:
Manual Approach: (For Advanced Users Only)
Step 1: Uninstall G Data Antivirus itself. (Choose one of the three options to follow)
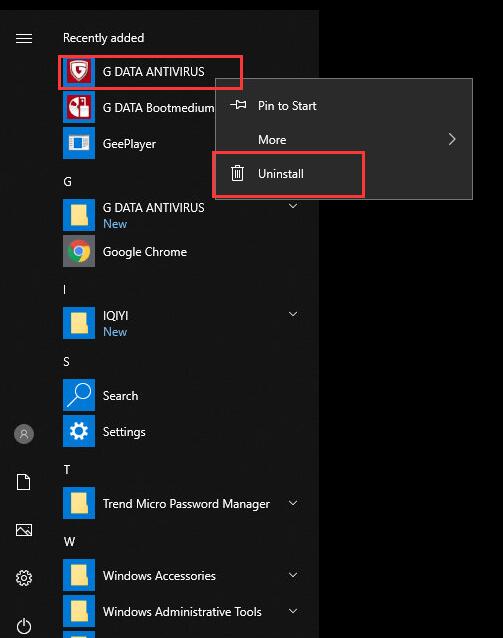
a) Open the Start Menu -> Locate G Data Antivirus in All Apps. Right-click on G Data Antivirus and choose Uninstall.
b) Or you can click Start menu -> choose Settings (the gear in the left) -> System -> Click Apps & Features. In the right pane, locate and click on G Data Antivirus to select it, then click on Uninstall. You will see a pop-up window informing you that the app and its related info will be uninstalled, then you just need to hit Uninstall to confirm the removal and go through the uninstallation utility by following the onscreen instructions.

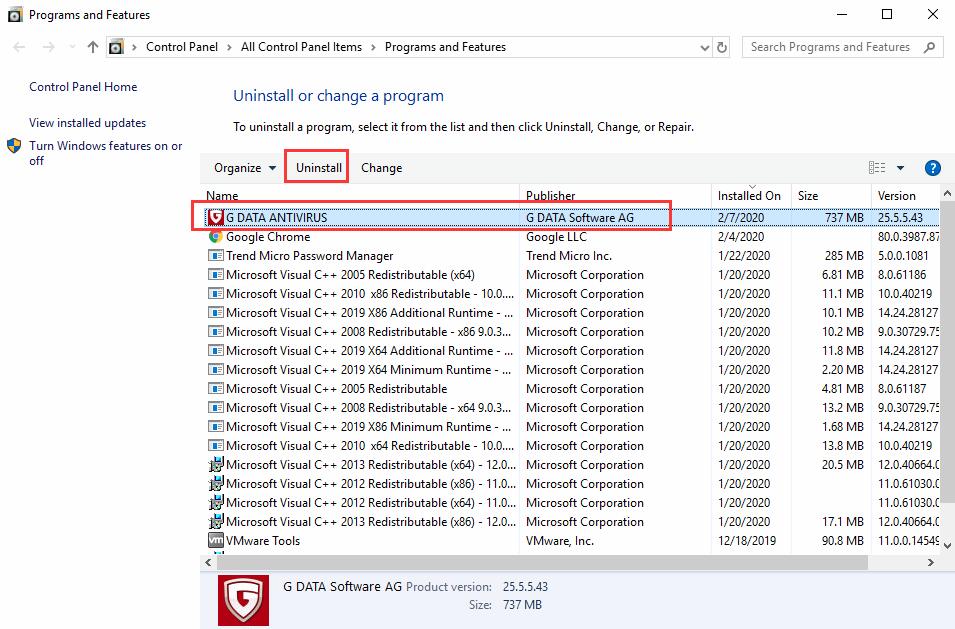
c) You also can uninstall G Data Antivirus using Add/Remove Programs feature in Control Panel. To do this, Right-click on the Start button -> click Control Panel -> Click Programs and Features (or Uninstall a Program if your Control Panel is in the category view) -> Select G Data Antivirus and Click on Uninstall in the resulting context menu. Also, go through the uninstallation utility by following the onscreen instructions, and G Data Antivirus will be uninstalled.
Step 2: Delete G Data Antivirus leftovers manually. (IMPORTANT STEP)
Warning: This manual removal instruction contains information about modifying the registry, so it is for ADVANCED USERS only. For added protection, please back up the registry before you modify it.
To find the residual files related to G Data Antivirus:
- Press the Windows + R keys and type in %programfiles%, %AppData%, and %Temp% in sequence in the dialog box that appears. It will open ProgramData folder, AppData folder and Temp folder. Just check if there are any folders there that have the name of G Data Antivirus. Delete such folders or files.
Next, you have to delete G Data Antivirus entries from Windows registry:
- Press Windows + R, and type in regedit in RUN box, then press Enter. It’ll open Registry Editor. Within the editor, use the left-hand navigation pane to navigate the directory structure of the registry to this location: HKEY_LOCAL_MACHINE\Software\Microsoft\Windows\CurrentVersion\Run\; HKEY_CURRENT_USER\Software;
- Once you have located the sub-key belonging to Typing Master 10 to uninstall (it might not have the exact same name as the target application), right-click on it and click on Delete in the resulting context menu. Click on Yes in the resulting popup to confirm the action.

Automatic Approach (Recommended)
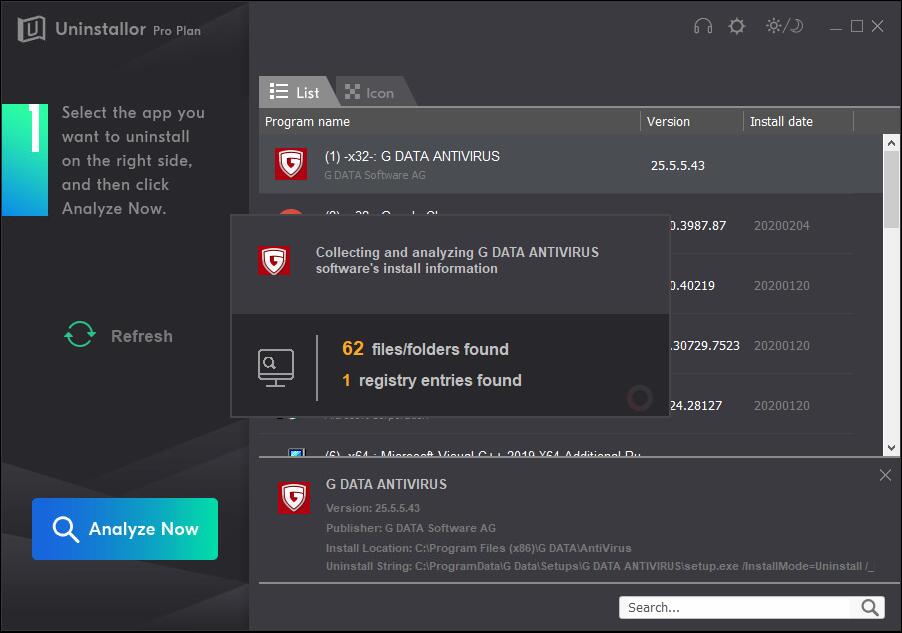
Uninstallor is a feature-rich uninstaller designed for anyone who wants to uninstall unwanted programs with one click. Uninstallor is easy to use and the installation is straightforward. Regardless of your computer skills, you can use it to uninstall G Data Antivirus and remove its leftovers easily. Here is how it works:
1. Analyze.
Select G Data Antivirus and simply click on Analyze Now button, then it will analyze all the data and files associated with G Data Antivirus automatically.
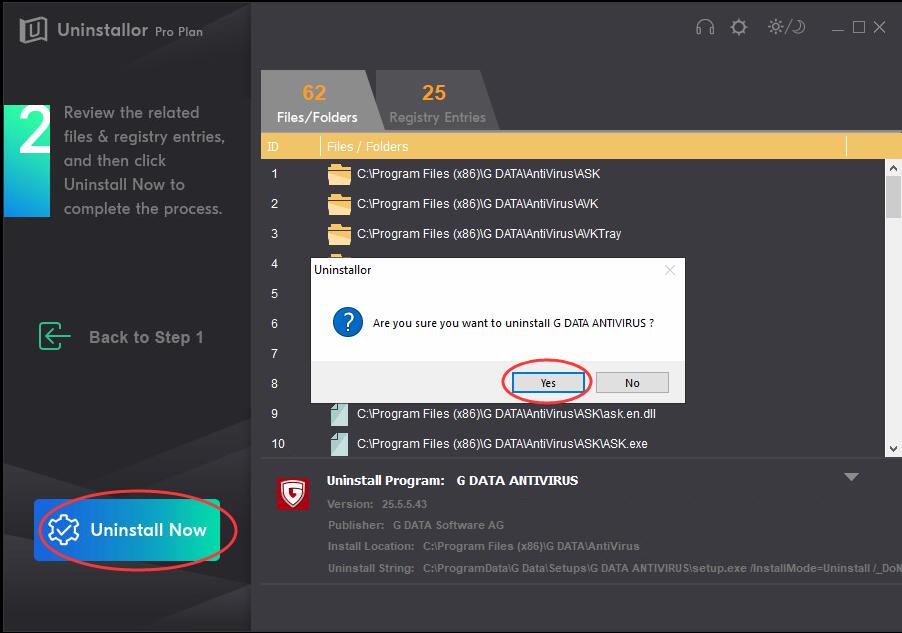
2. Uninstall.
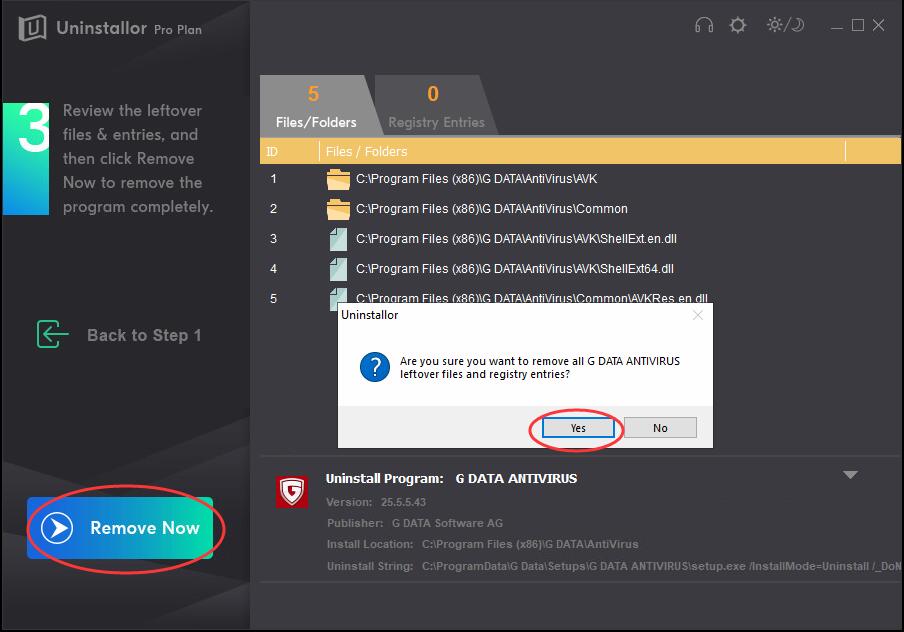
Next, click on Uninstall Now button to uninstall G Data Antivirus completely. If you are prompted for confirmation, click Yes, then go through the uninstallation utility by following the on-screen instructions.
3. Remove.
Click Remove to clear all the leftover files and registry entries for G Data Antivirus. You also need to click Yes for confirming the removal.
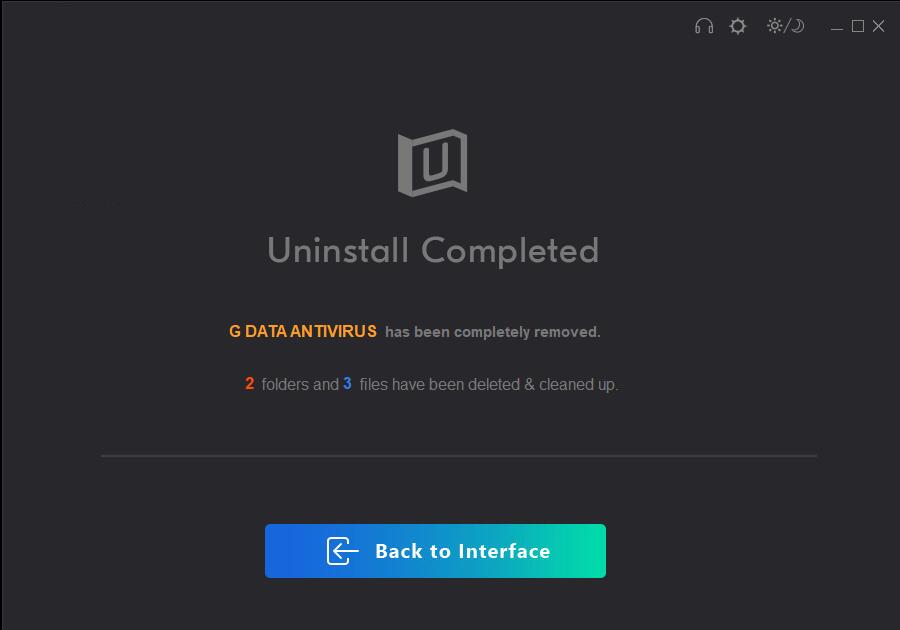
4. Uninstall Completed.
When Uninstallor tells you that G Data Antivirus has been removed, just reboot your computer to take effect.

Uninstall G Data Antivirus on Mac
When you no longer need G Data Antivirus, you probably can uninstall G Data Antivirus from your Mac computer by simply clicking and dragging them into the trash. But, removing the stored data it leaves behind sometimes requires a little more work. You have to find out its background files, support files and preference files, and then delete them all. To save your time, you can rely on Uninstallor to delete all connections of G Data Antivirus with one click. It helps you remove trace files that are left after simply moving G Data Antivirus to Trash, and also can remove unnecessary startup items, widgets, preference panes and other Mac extension for you.

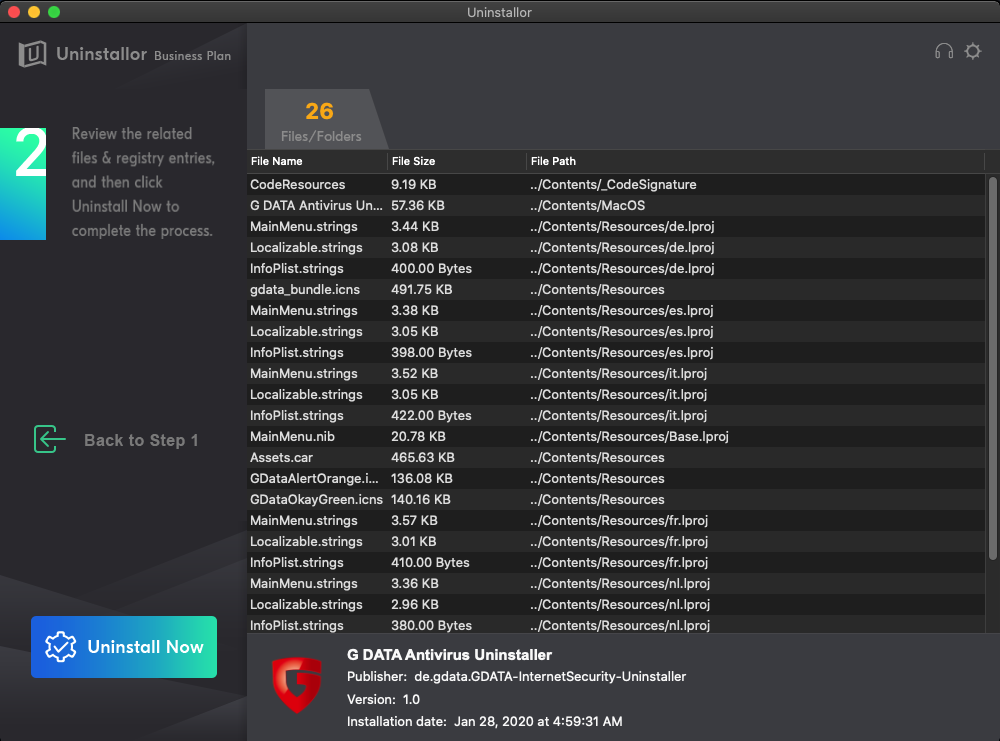
Installation is straightforward. It only takes a few seconds to find and remove trace files and leftovers left behind. Download Uninstallor & Give it a try! 30-Days Money-Back Guarantee. Risk-Free.
Conclusion:
Now you have mastered the most effective methods to uninstall G Data Antivirus on your Mac or Windows. We hope the instructions will work for you. Once again, we must remind that the manual approach stated above is a bit difficult and dangerous. You might be facing BSOD or system crash problem if you delete any wrong items. So, you’d better not take the risk doing so if you are not good at handling registry entries and dll files etc. There are various uninstallers available for uninstalling software on your computer. We highly recommend Uninstallor – an easy-to-use program and a powerful uninstall utility. Uninstallor is suitable for all-level users. It will accurately find out leftover files in your hard drive and remove files and registry settings associated with G Data Antivirus in one click. Try Uninstallor risk-free now!
Published by Tony Shepherd & last updated on February 26, 2020 4:47 am


Leave a Reply
You must be logged in to post a comment.