
“I recently updated my Mac book Pro to the OSX Operating System, Mavericks. Everything seemed to be working smoothly until my Calendars got stuck and all I get was this message “moving calendars to server accounts”. At first I thought that it was an update that came with the new OS but it never went away making my calendar completely un-usable. Also, when I log in to the computer there is an error message that says “network accounts not available”. I can still log in and I can still use everything, including exchange and Google mail via the mail client, but my iCal won’t work. I don’t know how to fix this? Please help me.”
Here is sulution about Calendar get stuck on Mac OS X
Calendar get stuck– Have you encountered the same issue? If you get some errors with your Calendar app in OS X, such as “moving calendars to server accounts” or long loading times. So how can we solve this problem? Someone suggesting signing out of iCloud and back in. The issue is that a lot of people, when doing that, are losing all of their calendar events. Two things – if you sign out, iCloud warns that if you sign out or unclick Calendars that info will be deleted. Also, the suggestion is that you create a backup from Calendars in case everything does get deleted. But you can’t do that because Calendars is stuck in the “moving to server” mode and all options are grayed out. Whatever happens, the following methods may help you fix the problem.
Step 1: backup of your calendars before you do anything else. In iCal’s sidebar, select the calendar you want to back up. You may wish to do this before troubleshooting an issue with a specific calendar, for example. Use this method for any CalDAV calendars.
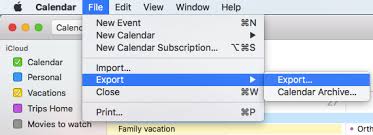
1. From the File menu, choose Export.
2. Save the file. It will be saved as an .ics file.
3. Repeat the process for each calendar you want to back up.
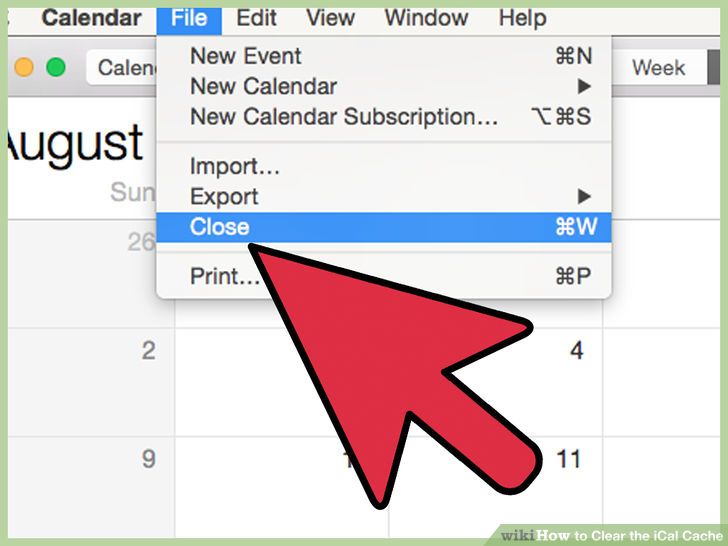
Step 2: Exit the Calendar application. Click the File menu and select “close” to ensure that calendar is closed completely.
1. Choose Force Quit from the Apple menu, or press Command-Option-Esc. This is similar to pressing Control-Alt-Delete on a PC.
2. Select the unresponsive app in the Force Quit window, and then click Force Quit.
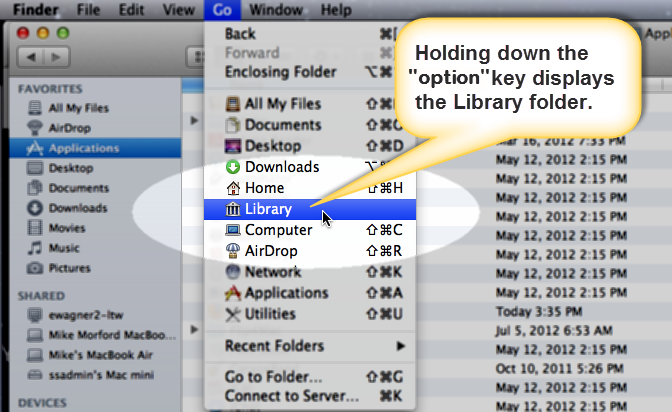
Step 3: Open the Finder window or click the desktop. This will make the “Go” menu appear in the top menu bar. The Finder icon can usually be located in the Dock, or you can open any folder. Click the desktop also makes Finder active, as the desktop is considered a Finder window. And then select the “Library” from the list of options. The “Library” option will only appear if you are holding the “Option” key. Select it to open ‘Library” folder. The Library folder is the system’s designated store for data that individual applications use but which you don’t view or edit outside of those apps. Think browser bookmarks, your e-mail archives, application preferences… and your calendars.
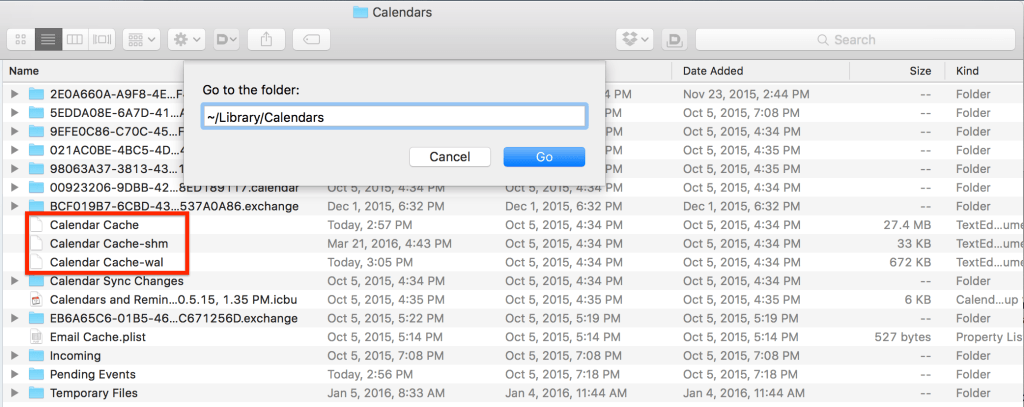
Step 4: Open the “Calendars” folder; delete all of the “Calendar Cache” files, the additional cache and preference files.
Calendar should automatically pick up your synced calendars from Google or Apple’s servers. If you only had your schedules stored on your Mac, use that Option-click trick to make the Library folder visible, then click the Time Machine icon in the Dock to see your backups of that folder, then select Calendars to have that restored from this backup. Note that if you’d hidden some of your calendars (for instance, Google Calendar includes a U.S.-holiday calendar that duplicates the one in OS X), they will now be visible again in the app. To hide them, click to clear the checkboxes next to those.
Note: Processing manual method is supposed to have a certain level of Mac literacy. If you are not sure how to start and are afraid of making any critical mistakes damaging the system, please live chat with YooCare/YooSecurity PC professional online service now.

Published by Tony Shepherd & last updated on October 30, 2016 1:38 pm


Leave a Reply
You must be logged in to post a comment.