Don’t know how to uninstall Blender software from Windows PC? Can’t uninstall Blender from Windows 10 because it is not showing up in Programs or giving you unexpected errors? How to get rid of every trace of Blender completely? Blender is a free and open source 3D creation suite supported by a global community of friendly volunteers, who are glad to offer assistance to newcomers and advanced users alike. Blender is free to use for any purpose, including commercially or for education. However, lately many Blender fans started complaining they had problems in using this software. They even failed to uninstall and reinstall Blender. Manual removal of Blender software is not an easy job for many common users. So, in this post, we are going to show you how to remove Blender and all its leftovers fully without messing up your computer. Let’s get started.
What is Blender?

When it comes to 3D modeling, Blender is definitely a favorite and remarkable application. In addition, this free and open source tool can be used for architectural visualization, video processing with motion and camera tracking, creating models for different purposes (e.g. 3d printing), 2d and 3d animation, visual effects and others. Blender supports Windows, Mac, and Linux. Its interface is very elaborated to have the palette of main tools in view of the user. Using Blender for your projects ensures long-term access to your files and you’ll accumulate skills that will be useful well into the future. That’s why Blender is loved by thousands of artists, scientists, students, visual effects experts, animators, game artists, artists, and other professionals around the world.
The Reasons Why You Uninstall Blender:

Blender is free, and it has many additional add-ons which are also free and receives new updates monthly with even more useful features. However, there are still reasons you may want to remove it from your computer. For a beginner, Blender is not a very friendly software to use. The UI is difficult, even for modestly experienced users, because of the sheer range of options available. It is difficult to teach yourself the software without going through quite a few online tutorials to figure the workflow out. Another reason that you may want to uninstall Blender is for troubleshooting. Sometimes, Blender may give you unexpected errors while you are using it. You may get “The exception unknown software exception (0xc0000409) occurred in the application at location 0x00718667” when you save your work in Blender. Or, on occasion you may find the Blender UI will not load up and the whole screen is gray when you start it. Freezing, crashing and slow responsiveness are also the reasons that cause you to get rid of Blender from your machine.
Unable to Uninstall Blender?
When it comes to uninstall a program, you can’t just simply drag it into the Recycle Bin like the way you delete a file or a folder, because whenever you install a piece of software, it installs several files and probably Registry entries on the system in order to work efficiently. Normally, we uninstall it from “Programs and Features” window under Control Panel. But, is it enough to fully delete everything related to the software? What if the program you want to uninstall is not listed there? Maybe you have realized that the Blender uninstall process is not as easy as you think. You may encounter problems like the following:
- Error messages such as “Blender is running on the PC and cannot be deleted” or “Blender cannot be uninstalled and encounters a problem”
- Blender has stopped working when you hit “Uninstall” option in control panel
- Blender is not listed on the Windows uninstaller
- Blender shortcuts or folders are still there even if you can’t see it in the program list anymore
The following instruction will teach you how to uninstall Blender and all its traces completely on Windows 10. Make sure that you follow the steps carefully.
How to Completely Uninstall Blender from Windows 10?
Method 1: Removal from Start Menu
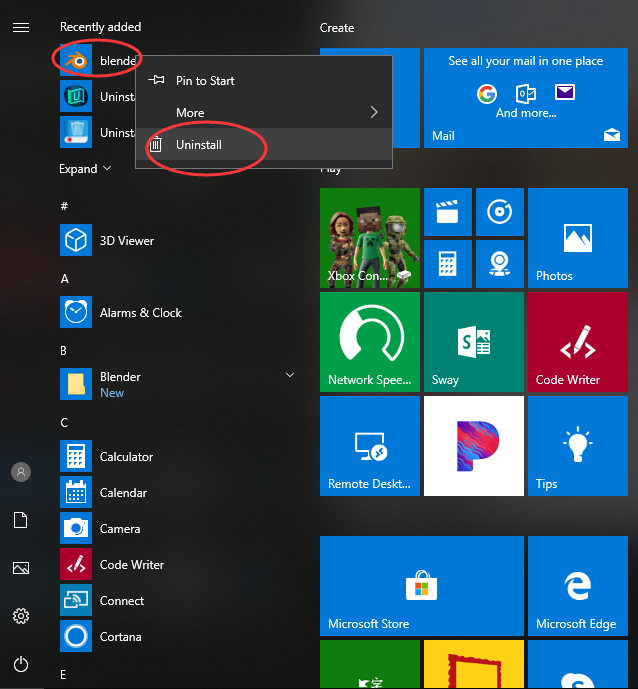
You can uninstall Blender directly from the Start menu. To do this, go to Start > All apps and find Blender. Right-click on it and then click Uninstall from the drop-down menu that appears. If you can’t find Blender in the Start menu, you can try other methods listed below.
Method 2: Removal from The Settings Menu
In some cases, you cannot find an app or program that you want to uninstall in the Start menu. So, you can try this way to remove it from the Settings Menu.
Here’s what you need to do:
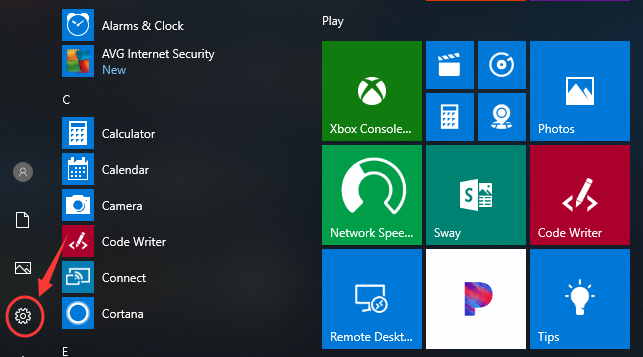
1. Go to Start->Settings.
2. Choose System and then click Apps & features. Here, you’ll see a full list of applications and programs on your computer, sorted by size. You can use the search box at the top of the screen to search for apps, and you can resort the list by name or by install date.
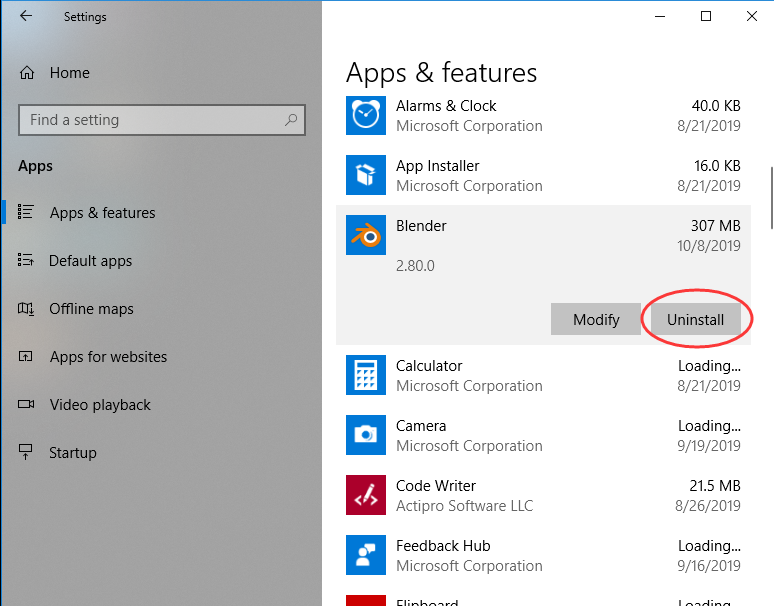
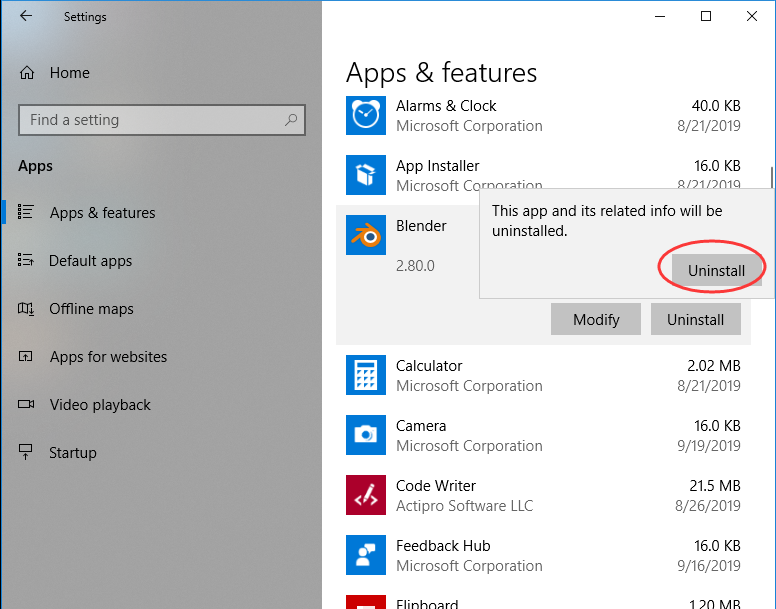
3. Select Blender and Click Uninstall to start the removal process. You will see a pop-up window informing you that the app and its related info will be uninstalled. Hit Uninstall to confirm the removal.
Method 3: Removal through the Add/Remove Programs Control Panel
If you prefer using Control Panel, that option is still available in the latest edition of Windows 10. However, from the Control Panel, you can only uninstall the desktop programs, not apps. Do the following:
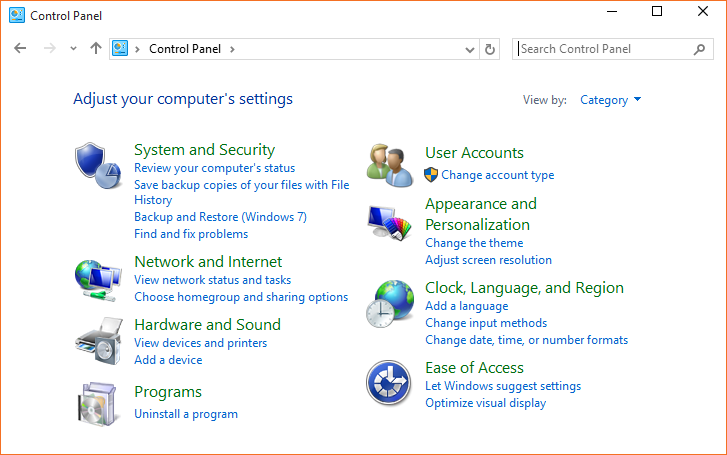
1. Right-click on the Start button (Windows logo button at the bottom-left corner of the desktop) and then click Control Panel to open it.
2. Go to Programs and Features (or go to Uninstall a Program if your Control Panel is in the category view).
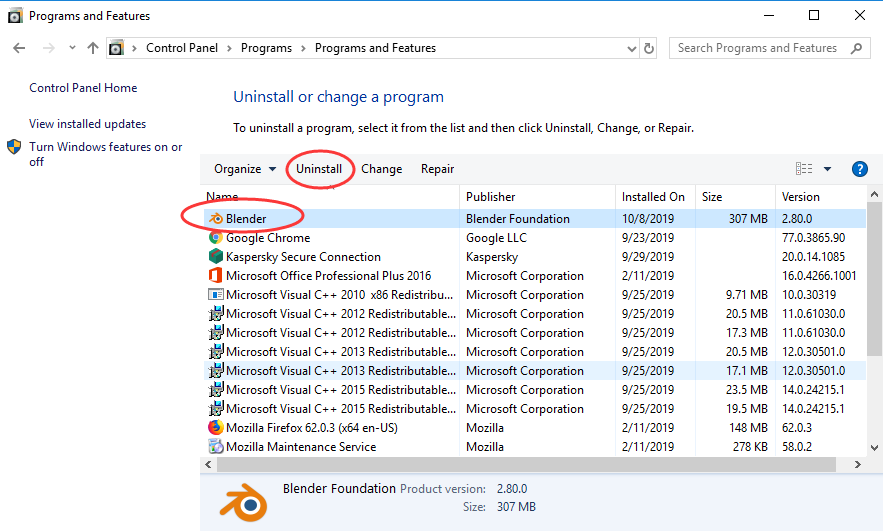
3. Right-click Blender and select Uninstall. You’ll see a pop-up window asking if you’re sure you want to uninstall this program, click Yes and click through the uninstall wizard, if applicable. After it is done, it will prompt the users to Reboot their computer to take effect.
WARNING:
The above three methods may help you get rid of Blender, but they may NOT clear it completely out of your system. Common leftover of Blender include registration files, empty folders, dll files and task schedule etc can be left behind. These leftovers may not pose a major threat. But, they tend to slow down your machine and may interfere the functionality of other programs, so there is no point of keeping them.
So, in the next step, you have to manually delete leftover file system and registry items. Be sure to back up all your important data first in case incorrect changes to the registry result in permanent data loss or corrupted files.
Check the following folders and delete associated files first.
- %AppData%
- %Temp%
- %ProgramData%
Next, you have to delete Blender entries from Windows registry.
Press Windows + R, and type in regedit in RUN box, then press Enter. It’ll open Registry Editor.
Locate the following keys:
- HKEY_CURRENT_USER\Software\Microsoft\Windows\CurrentVersion\
- HKEY_LOCAL_MACHINE\SOFTWARE\Microsoft\Windows\CurrentVersion\
- HKEY_LOCAL_MACHINE\SOFTWARE\Wow6432Node (64-bit system users will also need to check this extra key)
If you can find any keys with the name of Blender, just delete such keys.
Can’t figure out which items should be deleted? Don’t know where to get started? The manual method described above may be tricky and difficult especially if you have never used the Registry Editor in the past. If you cannot handle the manual removal job by yourself, you can contact our experts for help. There is also an easier way to help you remove Blender and all its traces automatically – Use Uninstallor. It completely removes all the remnants of any unwanted programs with just one system scan. Let’s see how it works.
Method 4: Uninstall Blender Using A Removal Tool (Recommended)
Compared to the Windows built-in uninstaller, Uninstallor can do a better job of deleting an application completely. Here’s how it works:
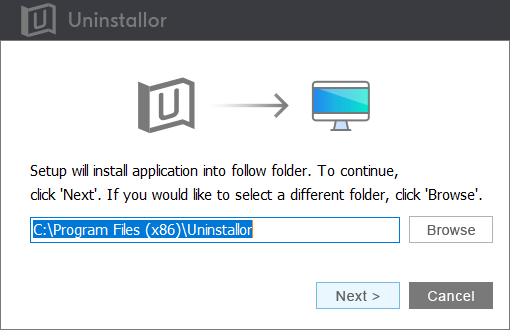
1. Download & Install Uninstallor on your machine. Uninstallor is quite lightweight and the installation is straightforward. The only option you have is to let you create a program shortcut to the desktop.
2. Launch Uninstallor. Uninstallor comes with an easy-to-use interface and it lets you switch to dark or light theme as you wish.
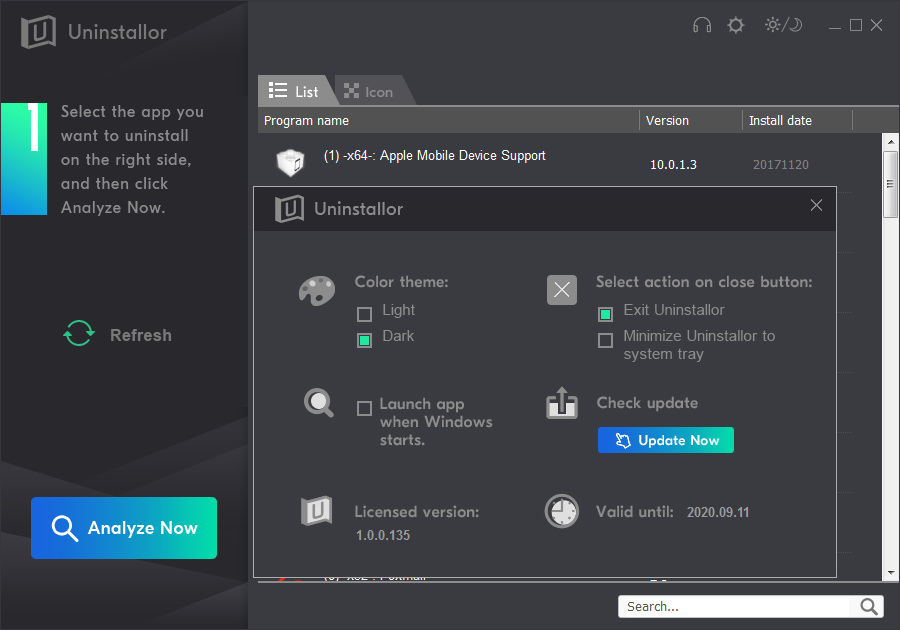
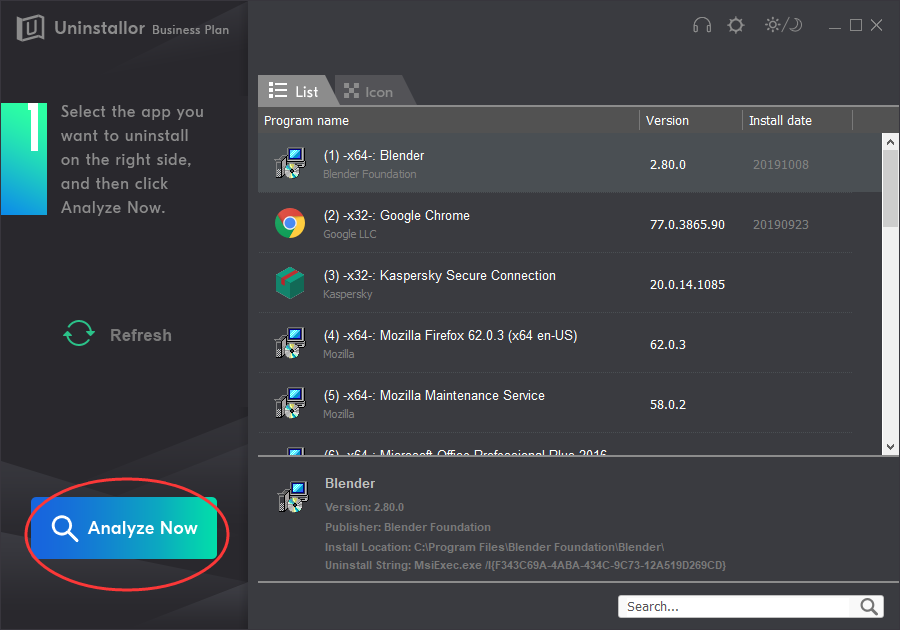
3. Scan for program components. Select the program that you want to uninstall and click on “Analyze Now” button. It will analyze all the data associated with the uninstalled program and searches for all leftover files.
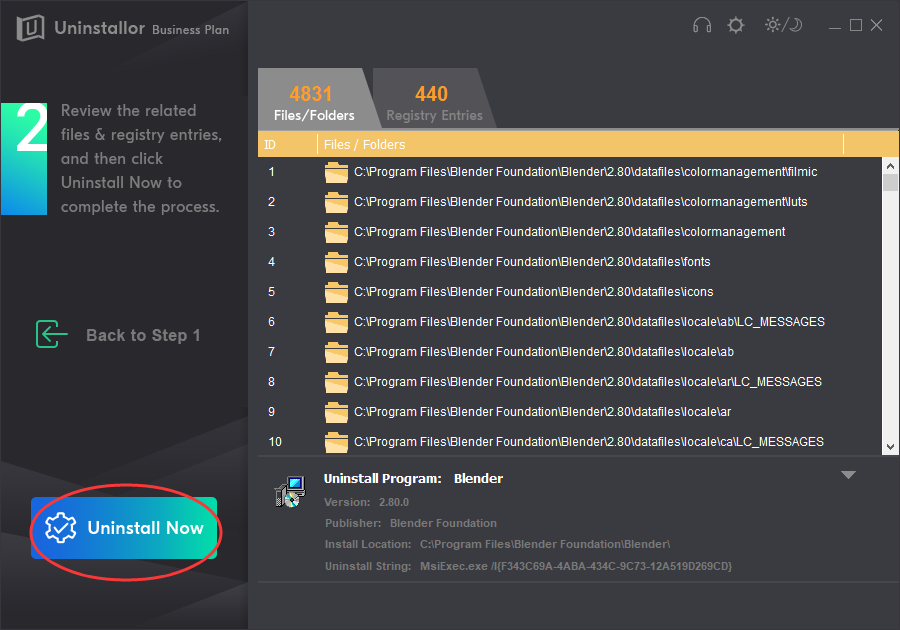
4. Perform complete removal. Click on “Uninstall Now” button to uninstall Blender completely. Next, you need to click on “Yes” to confirm the removal.
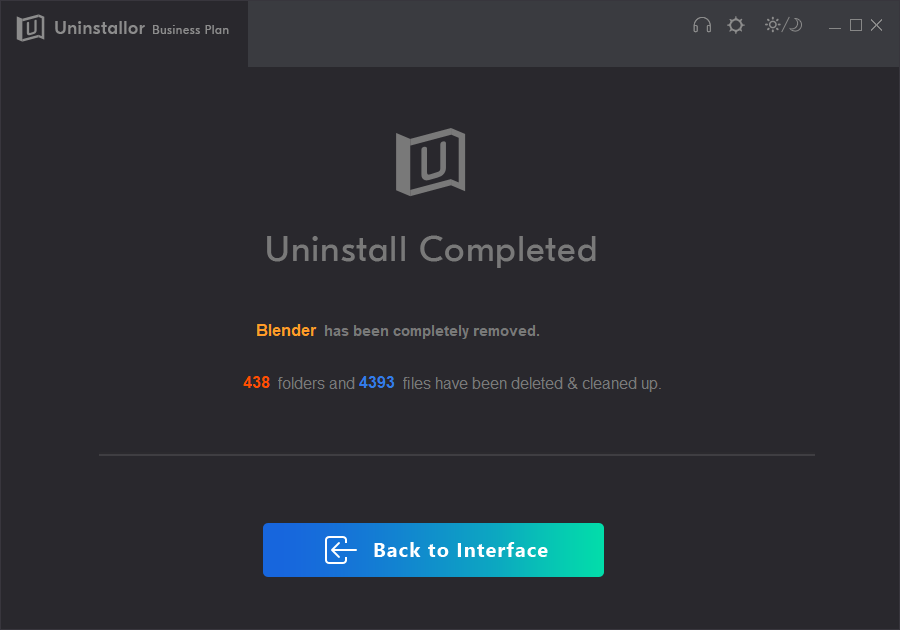
5. Wait until the uninstallation is completed. When the process is completed, you’ll see a summary of how many items were deleted. Just restart your computer to take effect.
Video Guide on How to Uninstall Blender in Windows 10
Conclusion:
Up to now understand how to uninstall Blender from your computer, correct? Blender is arguably the best open source program out there that offers features such as 3D modeling, rigging, texturing, smoke simulation, fluid, animation, rendering, skinning and video editing. But, not everyone loves this software. There are chances you may want to uninstall Blender from your computer. From the above instructions, you may have already mastered the approaches to remove Blender and all its traces. Whether you are considering perform a manual removal or an automatic removal with a powerful third-party uninstaller, just make sure no leftovers linger around after Blender is uninstalled. Please note, for people have no experience in editing registry entries, using Uninstallor – the powerful uninstaller – to remove Blender completely is always a smart way by saving your time and energy because the uninstallation can be done with just three steps. Contact online support team if you still have problems in uninstalling Blender.
Published by Tony Shepherd & last updated on October 30, 2019 8:11 am







Leave a Reply
You must be logged in to post a comment.